Remote connection to a Raspberry Pi without any cost is a practical solution for users who want to manage their devices from afar. In today's interconnected world, having the ability to access and control your Raspberry Pi remotely is more important than ever. Whether you're a hobbyist or a professional developer, setting up a free remote connection can save time and effort while boosting productivity.
With the rise of IoT (Internet of Things) devices and the increasing demand for remote work, Raspberry Pi has become one of the most versatile platforms for various applications. From home automation to server management, this small yet powerful device can be configured to perform a wide range of tasks. However, to truly unlock its potential, you need to learn how to establish a reliable and cost-effective remote connection.
In this comprehensive guide, we will explore everything you need to know about setting up a free remote connection for your Raspberry Pi. We'll cover essential topics such as software tools, security considerations, and troubleshooting tips. By the end of this article, you'll have all the knowledge and resources required to manage your Raspberry Pi remotely without spending a dime.
Read also:Kim Raewon Wife A Closer Look At The Life And Love Of The Renowned Korean Actor
Table of Contents
- Introduction to Free Remote Connection Raspberry Pi
- Benefits of Using Free Remote Connections
- Essential Tools for Free Remote Connections
- Step-by-Step Setup Guide
- Security Considerations for Remote Connections
- Troubleshooting Common Issues
- Alternative Methods for Remote Connections
- Advanced Techniques for Remote Connections
- Real-World Use Cases
- Conclusion and Next Steps
Introduction to Free Remote Connection Raspberry Pi
Raspberry Pi is a popular single-board computer used by enthusiasts and professionals alike. One of its most valuable features is the ability to connect remotely, allowing users to manage their devices from anywhere in the world. However, not everyone has the budget to invest in premium remote access solutions. Fortunately, there are several free tools and methods that can help you achieve this goal.
Why Choose Free Solutions?
Free remote connection tools offer a cost-effective way to manage your Raspberry Pi without compromising on functionality. These tools are often open-source, meaning they are developed and maintained by a community of experts who ensure their reliability and security. Additionally, using free solutions allows you to allocate your budget to other critical areas of your project.
Popular Use Cases
Remote connections are particularly useful for tasks such as:
- Managing IoT devices
- Running headless servers
- Performing software updates
- Accessing files and applications
Benefits of Using Free Remote Connections
Setting up a free remote connection for your Raspberry Pi comes with numerous advantages. Below are some of the key benefits:
Cost-Effectiveness
One of the most significant advantages of using free remote connection tools is the lack of financial burden. Unlike paid solutions, these tools do not require any subscription fees, making them ideal for hobbyists and small-scale projects.
Flexibility
Free tools often provide a wide range of customization options, allowing users to tailor the setup to their specific needs. This flexibility ensures that you can optimize your remote connection for performance and security.
Read also:How Tall Is Michael Weatherby Unveiling The Height Of The Rising Star
Community Support
Since many free remote connection tools are open-source, they benefit from a vibrant community of developers and users who actively contribute to their improvement. This community support ensures that any issues or bugs are quickly addressed, providing a reliable and stable solution.
Essential Tools for Free Remote Connections
Several tools are available for establishing free remote connections to your Raspberry Pi. Below are some of the most popular options:
SSH (Secure Shell)
SSH is a widely used protocol for secure remote access. It allows you to connect to your Raspberry Pi from another computer and execute commands as if you were physically present. SSH is included by default in most Raspberry Pi operating systems, making it an excellent choice for beginners.
VNC (Virtual Network Computing)
VNC enables you to remotely access the graphical user interface (GUI) of your Raspberry Pi. This is particularly useful if you need to interact with applications that require a visual interface. Tools like RealVNC and TightVNC offer free versions that are compatible with Raspberry Pi.
ngrok
ngrok is a tunneling tool that allows you to expose your Raspberry Pi to the internet temporarily. This is useful for testing and debugging applications that require external access. While ngrok offers both free and paid plans, the free version provides sufficient functionality for most users.
Step-by-Step Setup Guide
Setting up a free remote connection for your Raspberry Pi is relatively straightforward. Follow the steps below to get started:
Enable SSH
1. Connect your Raspberry Pi to a monitor and keyboard.
2. Open the terminal and type the following command:sudo raspi-config
3. Navigate to "Interfacing Options" and enable SSH.
4. Reboot your Raspberry Pi to apply the changes.
Install VNC
1. Open the terminal and type:sudo apt update
2. Install RealVNC by running:sudo apt install realvnc-vnc-server realvnc-vnc-viewer
3. Launch the VNC server and configure it according to your preferences.
Set Up ngrok
1. Download ngrok from the official website.
2. Extract the downloaded file and move it to a convenient location.
3. Open the terminal and navigate to the ngrok directory.
4. Start the tunnel by typing:./ngrok tcp 22
Security Considerations for Remote Connections
While free remote connection tools are convenient, it's essential to prioritize security to protect your Raspberry Pi from unauthorized access. Below are some best practices to follow:
Use Strong Passwords
Ensure that your Raspberry Pi is protected with a strong, unique password. Avoid using common words or easily guessable combinations.
Enable Two-Factor Authentication
Two-factor authentication adds an extra layer of security by requiring a second form of verification in addition to your password.
Regularly Update Your Software
Keep your Raspberry Pi's operating system and all installed software up to date to patch any vulnerabilities.
Troubleshooting Common Issues
Even with careful setup, issues can arise when establishing a remote connection. Below are some common problems and their solutions:
Unable to Connect via SSH
Ensure that SSH is enabled on your Raspberry Pi and that the correct IP address is being used. Additionally, verify that your firewall settings allow incoming SSH connections.
VNC Connection Fails
Check that the VNC server is running and that the correct port is being used. Ensure that your network configuration allows VNC traffic.
ngrok Tunnel Not Working
Verify that ngrok is correctly installed and that the command syntax is accurate. Restart the tunnel if necessary.
Alternative Methods for Remote Connections
In addition to the tools mentioned earlier, there are several alternative methods for establishing remote connections to your Raspberry Pi:
TeamViewer
TeamViewer is a popular remote access tool that offers both free and paid versions. While the free version is limited to personal use, it provides a user-friendly interface and robust features.
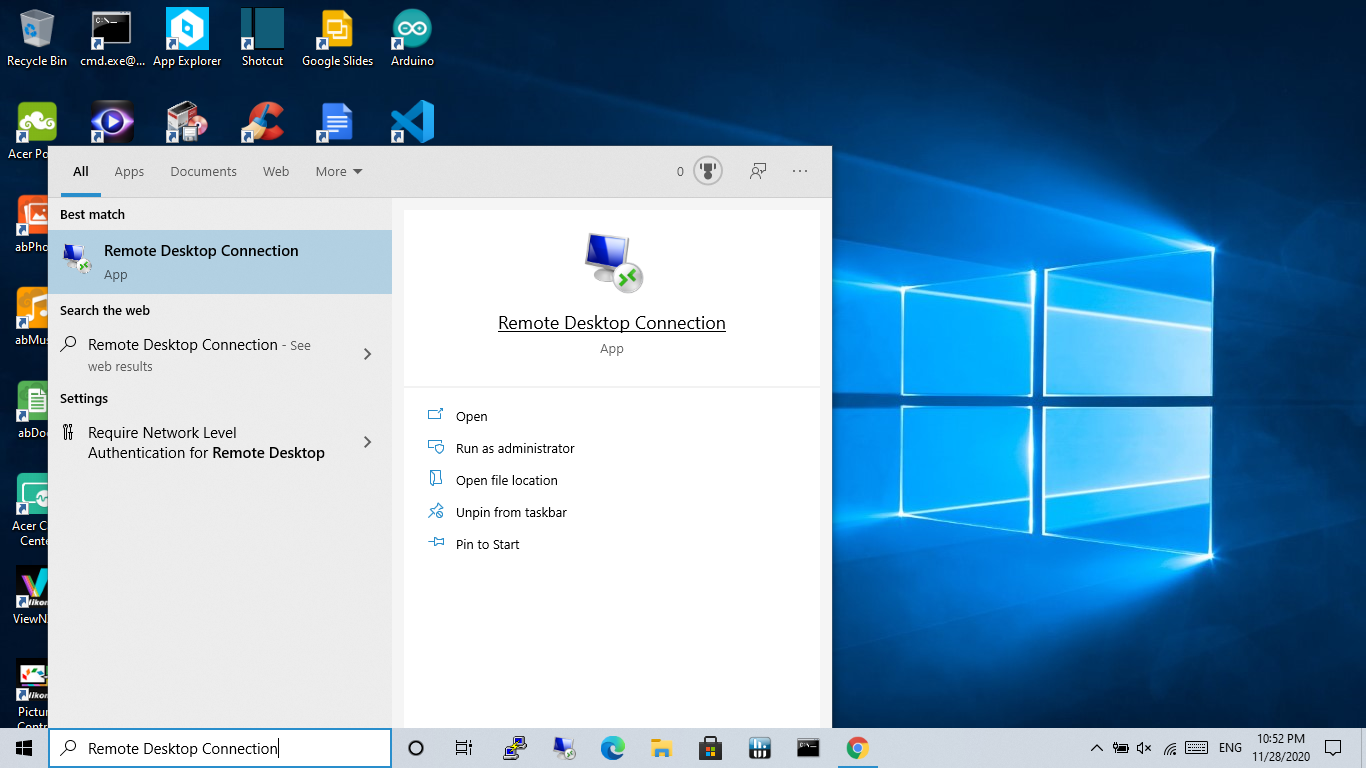
Remote Desktop Protocol (RDP)
RDP allows you to connect to your Raspberry Pi using Microsoft's Remote Desktop client. This method is particularly useful if you're working on a Windows machine.
Advanced Techniques for Remote Connections
For users seeking more advanced functionality, there are several techniques to enhance your remote connection setup:
Port Forwarding
Port forwarding allows you to map specific ports on your router to your Raspberry Pi, enabling direct access from the internet. This method requires careful configuration and security considerations.
Dynamic DNS
Dynamic DNS services update your Raspberry Pi's IP address automatically, ensuring that you can always connect remotely even if your IP changes.
Real-World Use Cases
Remote connections to Raspberry Pi have numerous practical applications. Below are some examples:
Home Automation
Manage your smart home devices from anywhere by connecting remotely to your Raspberry Pi-based automation system.
Web Hosting
Use your Raspberry Pi as a personal web server and access your websites or applications remotely.
File Sharing
Set up a remote file-sharing service on your Raspberry Pi to access your files from any location.
Conclusion and Next Steps
In conclusion, setting up a free remote connection for your Raspberry Pi is a valuable skill that can enhance your productivity and expand the capabilities of your projects. By following the steps outlined in this guide, you can establish a secure and reliable connection without incurring any costs. Remember to prioritize security and explore advanced techniques to further optimize your setup.
We encourage you to share your experiences and ask questions in the comments section below. Additionally, feel free to explore other articles on our website for more tips and tutorials related to Raspberry Pi and remote connections.
References:
- Raspberry Pi Documentation
- ngrok Official Website
- RealVNC Raspberry Pi Guide